Thoughts on trends impacting our ability to thrive!
Header image

cruciferous_vegetables-01-604x270


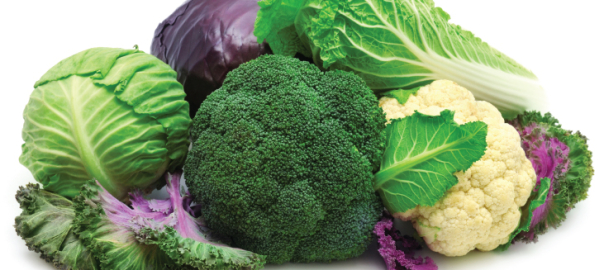
The onset of autumn and cooler weather provides a great opportunity for all of us to indulge our palates in the wide variety of cruciferous vegetables, which aren’t typically cultivated in abundance through the summer. These superfoods deliver a range of healthy nutrients from basic vitamins and minerals to very sophisticated phytonutrients well recognized for their role in cancer prevention. In spite of their pungent odor and bitter taste, their health-promoting potential makes the cruciferous vegetables compelling to consume. Let’s explore these unusual puppies.

These cruciferous vegetables are part of the Brassica genus of plants and include

Nutrients

Cruciferous vegetables are rich sources of a range of nutrients such as: vitamins C, E folate (B9), and K; minerals such as potassium; fiber; and phytonutrients. Among the most well identified phytonutrients in the cruciferous vegetables are beta-carotene, lutein, zeaxanthin and a unique group known as glucosinolates. In fact, it is the sulfur-containing glucosinolates that provide the pungent odor and bitter flavor familiar to the cruciferous vegetables.

Hydrolysis

Through the processes of food preparation, chewing, and digestion of the cruciferous vegetables, glucosinolates are broken down by a chemical reaction called hydrolysis — the addition of water to break down — to form biologically active compounds identified as indoles, nitriles, thiocyanates and isothiocyanates. Indole-3-carbinol (an indole) and sulforaphane (a glucosinolate) have most frequently been studied for their role in cancer prevention in several organs, including bladder, breast, colon, liver, lung, and stomach. Research has included animal studies, epidemiological studies (population based studies), and human clinical trials.

Cancer Fighting Properties

Sulforaphane glucosinalate and Indole-3-Carbinol have demonstrated their potential to inhibit the development of cancer through several biological mechanisms including:

Protecting cellular DNA from damage

Providing antioxidant potential

Inactivating carcinogens, through the process of detoxification

Inducing programmed cell death (apoptosis)

Inhibiting the process of tumor blood vessel formation (angiogenesis)

Inhibiting cancer cell migration (a process required for metastasis)

Exhibiting antiviral and antibacterial effects

Activate the anti-inflammatory cascade

Research has noted that although each compound exhibits its own cancer-preventing potential, they also work synergistically. In addition to the anti-cancer potential, the cruciferous vegetables also provide digestive and cardiovascular support.

Suggested Intake

Cruciferous vegetables should either be consumed raw or chopped and slightly steamed to retain their phytonutrients; however, preparing cruciferous vegetables in novel ways allows us to use these vegetables for any occasion.

Consume at least 3 cups per day in order to achieve cancer-prevention potential. Given the different benefits if each, choose a variety to add to your diet.

Tips for Adding Cruciferous Vegetables to Your Daily Diet

Blanch or steam cauliflower and broccoli, and eat with other raw vegetables as an afternoon snack.

Steam cauliflower, broccoli, and Brussels sprouts, and add to your salad.

Add chopped cruciferous vegetables to soups, stews, casseroles, or stir fries.

Replace lettuce with chopped kale in your salad.

Prepare healthy coleslaw with shredded mixed cabbage and carrot. Dress with organic, cold-pressed olive oil, organic rice vinegar, mustard, and honey. Season to taste.

Add cruciferous vegetables to a frittata or omelet, and eat for breakfast or lunch.

Substitute cauliflower for a grain to prepare your next pizza.

Cauliflower Pizza Crust

Ingredients 

1 Large head of cauliflower, about 7”-8” in diameter

Process

Remove the outer leaves and separate the florets.

Rinse the florets and place wet florets in the bowl of a food processor.

Pulse the cauliflower till it reaches a rice-like texture.

Place the cauliflower “rice” in a glass bowl and microwave for 8 minutes, or place the cauliflower in a baking sheet lined with parchment paper and roast in the oven at 450° F for 15 minutes.

Transfer the cooked cauliflower “rice” to a bowl lined with cheesecloth.

Grab the 4 corners and squeeze out as much liquid as you can, until the cauliflower is dry and looks mashed.

At this point, you can combine the cauliflower with other ingredients such as 1 egg, fresh or dried herbs, and grated cheese.

Flatten the cauliflower mash or mixed cauliflower dough into a pizza baking pan or on a baking sheet lined with parchment paper.

Bake for 15-20 minutes, and remove from the oven.

Top with your favorite pizza toppings and bake again until the cheese turns golden brown.


(Original post on boomspot)

Sept-Week1-604x270


Many of us who consume garlic and onions as a traditional part of our diets are familiar with the lingering odor that remains in our mouths and on our breaths for hours after the meal is complete. What produces these odors are the unique sulfur compounds of the lily or Allium family, which includes onions, leeks, and garlic. In addition to the thiosulfinates, the best known is allicin. Garlic and onions also contain other health-benefiting phytonutrients. Among these are other sulfur-containing compounds including sulfoxides, such as alliin, and dithiins such as 1,2-vinyldithiin. In addition, garlic and onion also deliver powerful flavonoids that have potent beneficial effects on our health.

How Allium Vegetables Benefit Your Health

Antioxidant and Anti-inflammatory Activity

Garlic is a reasonable source of vitamin B6, vitamin C and the minerals manganese and selenium. Selenium is an essential mineral that exhibits potent antioxidant activity by itself, in combination with vitamin E, and when it forms part of the antioxidant enzyme glutathione peroxidase. It also forms part of the selenoproteins, of which the thioredoxin reductase enzyme is one of the best known. This enzyme acts as a master coordinator of the body’s antioxidant potential by regulating the cells’ glutathione status.

Manganese, the other mineral present in garlic, is an essential cofactor in the production of another antioxidant enzyme present in our cells. This enzyme, superoxide dismutase, quenches a free radical generated through the energy-producing pathways of our cells.

One of the mechanisms by which the allicin in garlic has been shown to support the antioxidant activity in our bodies is through its potential to activate Nrf2, resulting in a cascade of events that ultimately leads to the production of very important molecules and enzymes associated with our antioxidant and anti-inflammatory potential, as well as apoptosis — commonly referred to as programmed cell death. The latter is critical for damaged or mutagenic cells to be disposed of before they can trigger a process associated with the development of a cancerous tumor.

Cardio-Protective Potential

Garlic offers cardio-protective benefits through the body’s ability to use the sulfur-containing molecules in garlic to form hydrogen sulfide gas. The hydrogen sulfide gas produced from garlic’s sulfur-containing molecules acts in a similar way to nitric oxide, a compound produced in cells and used by blood vessels for the purpose of dilation and relaxation. When blood vessels are dilated and relaxed, they can produce a healthy blood pressure response.

Research into the cardio-protective benefits of garlic and the other allium vegetables has also revealed their potential to lower blood triglyceride and total cholesterol by 5-15% when consumed as part of a healthy diet. In addition, ajoene – another sulfur compound found in the allium family of vegetables, has been repeatedly shown to exhibit anti-clotting activity by preventing blood platelets from sticking or clumping together to form clots.

The dithiiin, 1,2-vinyldithiin, and another sulfur compound, thiacremonone, have all been recognized for their anti-inflammatory potential. 1,2-Vinyldithiin, in its antioxidant activity, quenches the free radical species that act as scavenger molecules triggering the inflammatory cascade of events. Through the process of quenching these unstable reactive molecules, 1,2-vinyldithiin reduces the risk of oxidative damage.

Antibacterial, Antifungal and Antiviral Properties

Beyond the numerous cardio-protective, antioxidant, and anti-inflammatory benefits of the allium family of vegetables, garlic has also historically been prized for its antibacterial, antifungal and antiviral properties. Specifically, the sulfur compound ajoene has been used to treat Candida albicans, a common fungus associated with fungal infections.

Preparing and Cooking with Garlic and Onions

The health benefits of garlic are best achieved when it is either chopped or crushed. This form of preparation facilitates the conversion of the phytonutrient alliin into alicin, one of the primary compounds associated with the health benefits of garlic. Garlic should also be cooked gently and never over heated to maximize its value.

One of my favorite and easiest ways to prepare garlic and onion for consumption or use is to gently oven roast whole garlic bulbs and onions in their skins. This cooking process results in a very soft flesh that can be spread onto any food or incorporated into any recipe to enhance and develop the flavor.

Oven-Roasted Garlic Bulbs

Ingredients

  • 1 or more garlic bulbs
  • Olive oil

Process

  1. Position a rack in the middle of the oven and heat the oven to 300° F.
  2. Peel away the loose skin of the garlic, leaving the bulb intact.
  3. Slice ¼ off the top of the bulb, exposing the garlic cloves.
  4. Drizzle with a high quality organic, cold-pressed virgin olive oil.
  5. Wrap in recycled parchment paper and bake for about 60 minutes or until the garlic cloves are soft to touch.
  6. Remove from the oven and use the soft cloves immediately or cool and store in a tightly sealed glass container in the refrigerator for as long as 2 weeks or freeze for up to 2-3 months.

Potential Uses

  • Spread onto fresh warm bread or crunchy crackers
  • Incorporate into a butter and use as a spread for garlic bread, baked potatoes, or cauliflower mash
  • Blend into a salad dressing or mayonnaise
  • Mash into homemade hummus, baba ganoush, or other spreads
  • Incorporate into a sauce, stew or soup
  • Spread onto a grilled piece of meat, poultry, or fish with Himalayan salt and other herbs

Oven-Roasted Whole Sweet Onions

Ingredients

  • 6 medium Vidalia onions
  • Olive oil
  • Himalayan or Celtic salt
  • Fresh ground black pepper (if desired)

Process

  1. Position a rack in the middle of the oven and heat the oven to 300F.
  2. Peel away the loose paper off the whole Vidalia onion, leaving the onion intact.
  3. Slice ¼ off the top of the onion exposing the flesh.
  4. Place onions in a baking dish lined with parchment paper
  5. Drizzle with a high quality organic, cold-pressed virgin olive oil.
  6. Sprinkle with Himalayan and fresh ground black pepper.
  7. Bake at 300° F for about 50-60 minutes or until the flesh is soft enough to mash with a fork.

Potential Uses

  • Mash and spread onto fresh warm bread or crunchy crackers as a jam
  • Blend with organic salted butter and use as a spread for garlic bread, baked potatoes, grilled fish, chicken or steak or cauliflower mash
  • Blend into a salad dressing or mayonnaise
  • Blend into homemade hummus, baba ganoush or other spreads
  • Incorporate into a sauce, stew or soup

*Much like the oven-roasted whole garlic bulbs, the oven-roasted whole sweet onions can be mashed, smothered, blended or incorporated into a recipe or simply used as an independent flavor to complement a food.


(Original post on boomspot)

Aug-Week-Any-604x270


With the enduring summer heat and the abundance of fresh, nutritious offerings from the summer market basket, we need not stray from our commitment and intention to maintain our path to healing, health, and vitality as we negotiate dessert and its delightful iced offerings. In contrast to many commercially available brands, which are often burdened with unhealthy amounts of sugar and fat and also typically contain artificial dyes, flavors and preservatives to make them more appealing. These homemade frozen summer treats are made from simple ingredients and. when consumed in moderation, they are both delicious and nutritious. Indulge and enjoy!

Frozen Vanilla Coconut Ice Cream

Equipment

Ice cream maker
Note: You don’t need one to make this recipe, but they are simple to use.

Ingredients

  • 1 can coconut milk, organic full fat
  • 4 egg yolks
  • 4 tablespoons pure gluten-free vanilla extract (you may substitute with any flavor including chocolate, almond, cinnamon, coffee, etc.)

Process

  1. Half fill the bottom of a double boiler or pot with water, boil and reduce to a simmer.
  2. Place the top of the boiler or a heatproof bowl over the pot.
  3. Pour the coconut milk into the bowl, and add the vanilla extract.
  4. Heat till hot, but do not boil.
  5. Stir in flavorings such as honey at this point, or add in at the end to preserve the shapes.
  6. In a separate bowl, whisk the egg yolks and gently temper by adding in one ladleful of the heated coconut milk. Continue whisking vigorously slowly bringing up the temperature of the whisked egg yolks. Be careful not to cook the egg yolks.
  7. Add 2-3 more ladles of the heated milk, whisking continuously through the process.
  8. Pour the tempered eggs into the double boiler and continue whisking vigorously.
  9. Whisk until a thick custard is formed.
  10. Be careful not to overheat the custard and avoid the simmering water from entering the bowl.
  11. Remove the bowl from the stove and let cool on the counter.
  12. Once the custard has reached room temperature, add flavorings such as berries, desiccated coconut, chopped nuts or cacao nibs.
  13. Place the custard in the refrigerator and cool further.
  14. When custard is completely cooled, place in the ice cream maker and follow instructions.
  15. If you do not have an ice cream maker, place the bowl in the freezer, removing every 30 minutes to stir vigorously. Repeat this process every 30 minutes for 2-3 hours or until the ice cream is set.

Serving

Remove the ice cream from the freezer about 10 minutes before serving.
Plate and garnish with additional topping of choice.

Flavoring Options

  • ½ cup desiccated coconut, unsweetened
  • 1/3 cup raw cacao nibs
  • 1/3 cup chopped nuts of choice
  • ½ cup organic berries of choice
  • 3 tablespoons raw honey
  • Any combination of the above, adjusting the amount of the ingredients

Frozen Key Lime Pie

Ingredients

Crust

  • 2 cups raw cashews
  • ½ cup desiccated unsweetened coconut
  • 1 cup pitted Medjool dates
  • 1/8 teaspoon Himalayan salt

Filling

  • 2 ripe avocados, peeled and pitted
  • 4 tablespoons pure maple syrup or agave syrup
  • ½ cup lime juice, fresh squeezed if possible
  • 1 tablespoon coconut flour
  • 2 cans full fat coconut milk, refrigerated overnight
  • 1 teaspoon pure vanilla extract

Process

Crust

  1. Combine all ingredients in the bowl of a food processor, fitted with an “S” blade.
  2. Process until the ingredients are mixed and broken down well. They should stick together when you pinch a small amount and squeeze.
  3. Press the crust into the bottoms of an oiled, 9 x 9” square baking pan

Filling

  1. Combine avocadoes, maple or agave syrup, lime juice and vanilla extract in the bowl of the food processor, fitted with the “S” blade.
  2. Process until smooth and creamy.
  3. Remove the coconut milk from the refrigerator being careful not to shake the cans. Open the cans and scoop out the “cream” that has formed on the top and place in a glass or stainless steel bowl.
  4. Whisk with a hand beater until thick and stiff and resembles whipped cream. If the coconut cream removed from can is thin, then you may need to whisk for longer and increase the amount of coconut flour in the avocado mixture to 2 tablespoons instead of 1 tablespoon.
  5. Fold the coconut cream into the avocado mixture.
  6. Pour the filling over the crust.
  7. Cover and freeze for several hours or until firm.

Serving Suggestion
To serve, remove from freezer and let stand at room temperature for about 15 minutes. Cut into squares and divide among plates. Decorate with thinly sliced slices of lime.

Frozen Fruit Bars

There are many variations of frozen fruit bars you can create, which can simply be determined by the flavors you like and what you have available in your summer market basket. Here are some ideas to get you started:

Cucumber, Kiwi and Watermelon Refresher

Ingredients

  • ½ cup English cucumber, peeled and diced
  • 1 cup kiwi, peeled and diced
  • 1 cup watermelon, diced
  • 1 cup watermelon juice

Process

Combine diced fruit and cucumber in a bowl and fill 6 (5-ounce) disposable cups. Add enough watermelon juice to cover fruit, and insert ice cream or craft sticks. Place in freezer for a few hours until firm. To remove the ice pops from the cups, run under warm water for a few seconds.

Very Berry Greek Yogurt Cups

Ingredients

  • 1 cup organic plain Greek yogurt
  • ½ cup unsweetened berry juice
  • 2 cups berries of choice
  • Honey or maple syrup to sweeten if desired

You can substitute with regular plain organic yogurt or use vanilla yogurt and skip the sweetener. This recipe can also be made with coconut or almond yogurt for a vegan, dairy-free alternative. Any fruit and unsweetened juice can be used to create the flavor you desire.

Process

  1. Blend together the yogurt and the juice.
  2. Fold in the berries.
  3. Sweeten if needed.
  4. Divide among 4 (4-ounce) yogurt cups.
  5. Freeze for 4 hours, or until solid. To remove the cups, run under warm water for a few seconds.

Frozen Chocolate Banana Pops

Ingredients

  • 6 small bananas
  • 1 large bar dark chocolate, melted
  • Chopped peanuts, or any nut of choice

You can substitute with other fruit such as slices of kiwi, pineapple, strawberries, etc. You can also roll in other crunchy toppings including other nuts and desiccated coconut.

Process

  1. Melt dark chocolate in a double boiler, or bowl set on top of a pot to create a double. boiler. Do not overheat the chocolate.
  2. Insert a wooden “pop” stick into the banana.
  3. Dunk banana into the melted chocolate.
  4. Roll into chopped peanuts.
  5. Freeze

(Original post on boomspot)